What is Quarkus?
Quarkus is an open-source Java framework that has been designed to run on Kubernetes platforms for developing and delivering applications on platforms such as serverless and cloud-native environments.
Applications developed with Quarkus can be natively compiled on top of the GraalVM and HotSpot, as well as running on traditional Java Virtual Machines (JVMs).
Quarkus increases efficiency by optimizing Java to enable minimum startup time and memory usage in applications.
Quarkus vs. Spring Boot
Spring Boot is an open-source project built on top of Spring Framework that provides a simple way to create, configure and run web-based Java applications. Spring Boot has exceptional official documentation and a fantastic community behind it.
Both Quarkus and Spring Boot are comprehensive frameworks for developing and deploying Java applications.
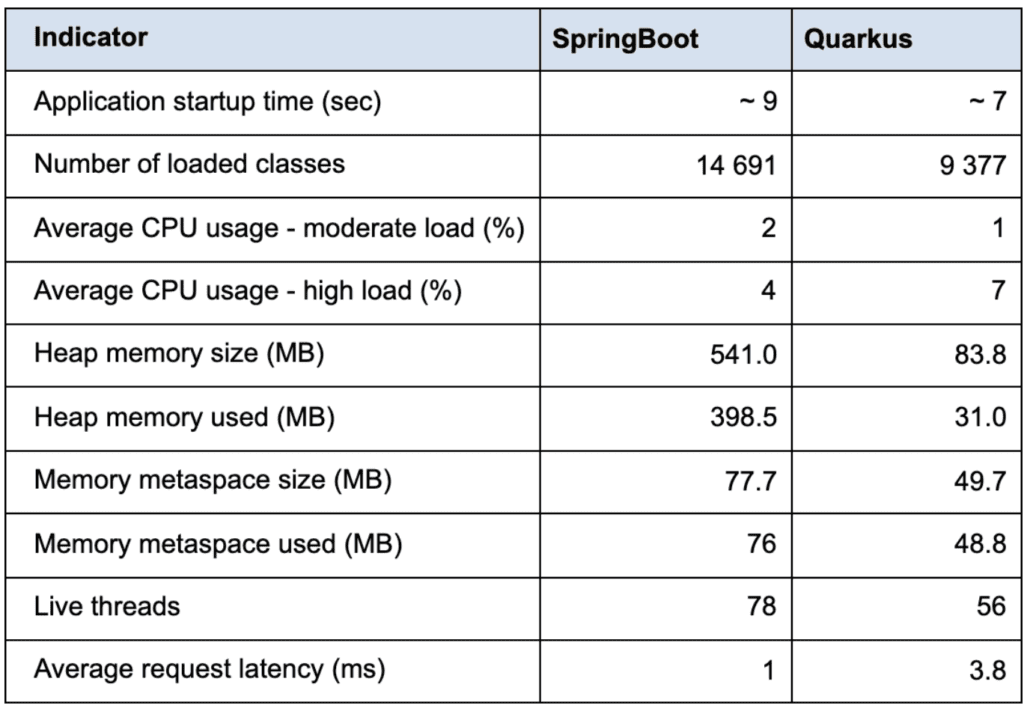
But unlike Quarkus, Spring Boot has higher startup times and more memory consumption in general. Quarkus provides faster hot reloads than Spring Boot because of the auto detections on the code.
Quarkus gives Dockerfiles by default, unlike Spring Boot. To Dockerize a Spring Boot application, check out my previous tutorial Dockerize a Spring Boot Application.
For a detailed inspection on the comparison between Spring Boot and Quarkus, check SpringBoot vs. Quarkus: a Real-Life Experiment tutorial that explains a real-life example.
Initialize a Quarkus Application
There are a few assumptions for these instructions;
- You have Apache Maven installed on your local environment!
- If you want to run with Docker, you need to have Docker installed, up and running!
I already initialized an application that contains a Reactive Kafka messaging example with Quarkus. Feel free to download the complete source code for this tutorial from the Exceptionly Github account.
Otherwise, run the followed command to initialize an application that will come with the below defaults;
- A default resource
- An enhanced UI that contains Quarkus how-to links and details for the application you just initialized
- Dockerfiles for native (no JVM) and JVM mode
					$ mvn io.quarkus.platform:quarkus-maven-plugin:2.5.1.Final:create \
    -DprojectGroupId=org.exceptionly \
    -DprojectArtifactId=quarqus-demo \
    -DclassName="org.exceptionly.demo.QuarkusResource" \
    -Dpath="/ping"
Apache Kafka Reactive Messaging with Quarkus
To enable the application to produce and consume data from Kafka, I will start a Kafka cluster with Docker Compose. First, create a docker-compose.yaml file with the following content in the src/main/docker folder.
					version: '2'
services:
  zookeeper:
    image: strimzi/kafka:0.11.3-kafka-2.1.0
    command: [
        "sh", "-c",
        "bin/zookeeper-server-start.sh config/zookeeper.properties"
    ]
    ports:
      - "2181:2181"
    environment:
      LOG_DIR: /tmp/logs

  kafka:
    image: strimzi/kafka:0.11.3-kafka-2.1.0
    command: [
        "sh", "-c",
        "bin/kafka-server-start.sh config/server.properties --override listeners=$${KAFKA_LISTENERS} --override advertised.listeners=$${KAFKA_ADVERTISED_LISTENERS} --override zookeeper.connect=$${KAFKA_ZOOKEEPER_CONNECT}"
    ]
    depends_on:
      - zookeeper
    ports:
      - "9092:9092"
    environment:
      LOG_DIR: "/tmp/logs"
      KAFKA_ADVERTISED_LISTENERS: PLAINTEXT://localhost:9092
      KAFKA_LISTENERS: PLAINTEXT://0.0.0.0:9092
      KAFKA_ZOOKEEPER_CONNECT: zookeeper:2181
Update application.properties to configure the Kafka connector by following up the configuration structure.
mp.messaging.[outgoing|incoming].{channel-name}.property=value
					//Producer
mp.messaging.outgoing.generated-price.connector=smallrye-kafka
mp.messaging.outgoing.generated-price.topic=prices
mp.messaging.outgoing.generated-price.value.serializer=org.apache.kafka.common.serialization.IntegerSerializer

//Consumer
mp.messaging.incoming.prices.connector=smallrye-kafka
mp.messaging.incoming.prices.value.deserializer=org.apache.kafka.common.serialization.IntegerDeserializer
We can think outgoing as producer and incoming as a consumer. So in the above example, the channel name would be generated-price for the topic prices, and incoming message configuration can be made based on the source prices.
The code piece below will publish a random integer every 5 seconds to the channel generated-price.
					@Outgoing("generated-price")
public Flowable<Integer> generate() {
   return Flowable.interval(5, TimeUnit.SECONDS)
           .map(tick -> random.nextInt(100));
}
From the opposite side, a consumer will listen to prices topic and update the LATEST_PRICE variable
that has been exposed via an API whenever the /price endpoint is called.
					private static final double CONVERSION_RATE = 0.98;
private static double LATEST_PRICE = 0.00;

@Incoming("prices")
public void process(int priceInUsd) {
   LATEST_PRICE = priceInUsd * CONVERSION_RATE;
}
Expose the most recent message with a REST API.
					@GET
@Produces(MediaType.TEXT_PLAIN)
public double price() {
   return priceConverter.price();
}
Running the Application in Dev Mode
Navigate to the docker folder and start the Kafka cluster as a first step. Once the Kafka container is up and running, run the application in dev mode by following commands.
					$ cd src/main/docker
$ docker-compose up
$ ./mvnw compile quarkus:dev
The application is providing live coding by default, so any change that has been made will reflect right away.
Navigate to http://localhost:8080/ from your browser to enjoy your very first Quarkus application.
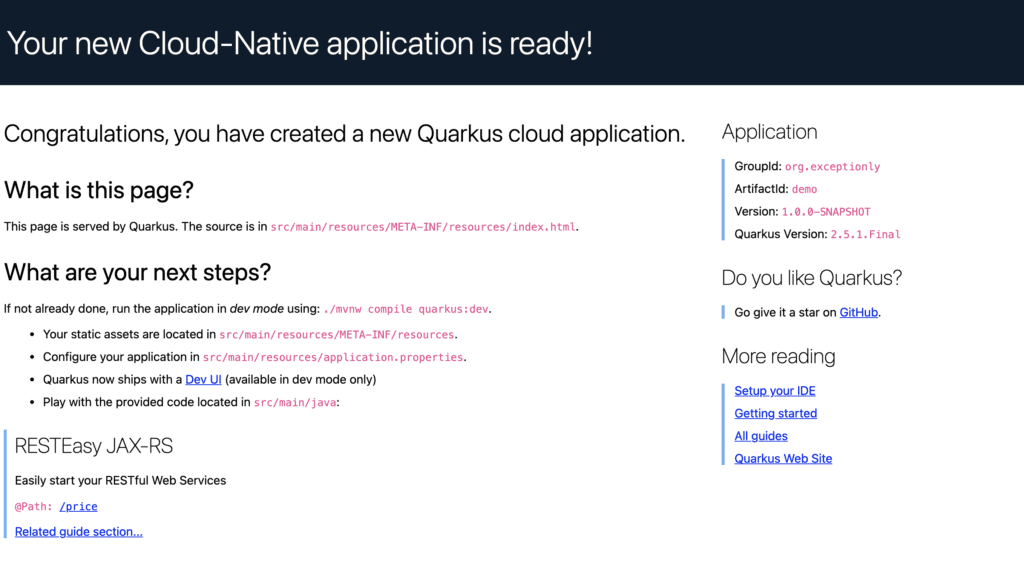
You will see the REST APIs under the title RESTEasy JAX-RS. Click the /price endpoint to check the most recent consumed message multiplied with a conversion rate.
I took advantage of official Quarkus documents to write this tutorial.
Feel free to check out my previous posts from the followed links!

4 Responses