
React Native is an open-source Javascript library developed by Facebook that allows you to build native mobile apps. Remember the catch-phrase for React Native “Learn once, write anywhere.” Cross-platform ability accurately portrays React Native as previously we used to code in Java for Android and Swift/Obj-C for IOS applications. But with React Native, the codebase written in Javascript is rendered with native code.
The applications implemented with React Native can work on multiple platforms such as Android and iOS.
With gaining popularity and taking the community support behind, it slightly increased its market share and was considered commercially viable.
Facebook, Skype, Instagram, Discord, and Walmart mobile applications are only a few examples that have been developed with React Native.
As I aim this tutorial to be a hands-on practice for new beginners, I’ll get you started to code in React Native with an easy and smooth example.
How to set up your local environment for React Native?
Install NodeJS
Make sure you have a recent version of node.js installed.
Download the installer from nodejs.org and run it. Then, follow the instructed steps to finalize the installation.
Verify the installation;
					% node --version
v16.13.0
Install Expo in your local environment
We will create a React Native application with the Expo framework. It is easier to design, develop, build, deploy react-native applications with Expo. So make sure you have Expo installed with the instructions below;
Install command-line tools for Expo;
$ npm install --global expo-cli
Install Expo on your phone & tablet
Install Expo to your mobile device from Google Play Store for Android or App Store for IOS.
Initialize a new application with Expo
Create a project named todo. Select the “blank” template when prompted;
					$ expo init todo
┌────────────────────────────────────────────────────────────────────────┐
│                                                                         │
│   There is a new version of expo-cli available (5.3.0).                 │
│   You are currently using expo-cli 5.0.3                                │
│   Install expo-cli globally using the package manager of your choice;   │
│   for example: `npm install -g expo-cli` to get the latest version      │
│                                                                         │
└─────────────────────────────────────────────────────────────────────────┘
 Choose a template: › blank               a minimal app as clean as an empty canvas
 Downloaded and extracted project files.
 Using npm to install packages.
 Installed JavaScript dependencies.
 Your project is ready!
To run your application, navigate to the project’s root directory and run the following npm commands based on your choice for Android, IOS, or WEB.
					$ cd todo
// npm start # you can open iOS, Android, or web from here, or run them directly with the commands below.
$ npm run android
$ npm run ios
$ npm run web
Opening the mobile application on your phone & tablet
It is pretty straightforward to run/test React Native applications with Expo. Once you run the application for the platform of your choice, you will be prompted with a QR code in the console, and that will lead you to the application to be opened on your phone or tablet.
With the below command, you will be directed to localhost:19002 to scan the QR code.
$ npm run ios;
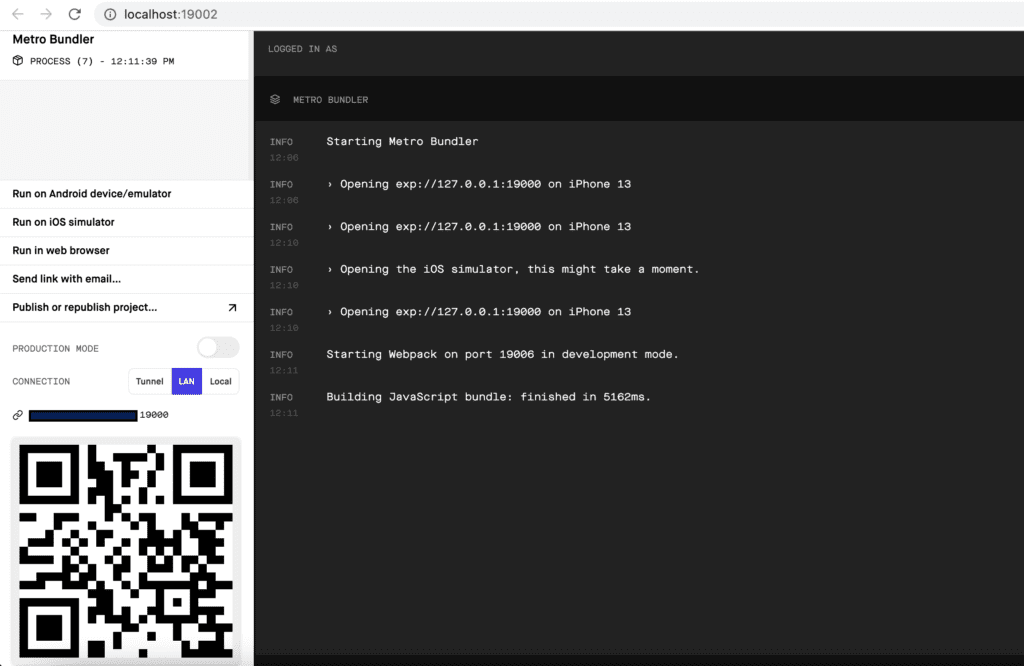
You can run “npm run web” to work only on your laptop from localhost:19002.
You can open App.js from the source code and change the text to “Hello, world!” to see it updated right away on your device or browser.
A simple React Native navigation example
In this example, we will add navigation to the to-do project.
Please run the below commands to install the React navigation libraries in your project. There are multiple navigation options in React Native; for this particular example, I will go with native-stack.
					$ npm install @react-navigation/native
$ npm install @react-navigation/native-stack
Please re-run the application and update the App.js file with the following code.
					import * as React from 'react';
import { Button, View, Text } from 'react-native';
import { NavigationContainer } from '@react-navigation/native';
import { createNativeStackNavigator } from '@react-navigation/native-stack';

function HomeScreen({ navigation }) {
  return (
      <View style={{ flex: 1, alignItems: 'center', justifyContent: 'center' }}>
        <Text>Home Screen</Text>
        <Button
            title="Go to Account"
            onPress={() => navigation.navigate('Accounts')}
        />
      </View>
  );
}

function AccountScreen({ navigation }) {
  return (
      <View style={{ flex: 1, alignItems: 'center', justifyContent: 'center' }}>
        <Text>Details Screen</Text>
        <Button title="Go to Home" onPress={() => navigation.navigate('Home')} />
      </View>
  );
}

const Stack = createNativeStackNavigator();

function App() {
  return (
      <NavigationContainer>
        <Stack.Navigator initialRouteName="Home">
          <Stack.Screen name="Home" component={HomeScreen} />
          <Stack.Screen name="Accounts" component={AccountScreen} />
        </Stack.Navigator>
      </NavigationContainer>
  );
}
export default App;
Verify the changes for Home Screen and Account Screen on your device.
Conclusion
React Native’s official website has excellent documentation and many examples. The best way to learn a tool or a language is through practice.
So I highly encourage you to go through the official documents to understand them in detail and challenge it yourself after this tutorial.
Exceptionly blog has excellent tutorials for challenging languages methodologies or tools.
Check out some of the Javascript-based posts for beginners.
